Sunshine of my life

Sunshine of my life.jpg

Hey Power Poppy friends! Welcome to another Inspire me Monday, and my first Inspire me Monday post for you all. I thought for my first post I would give you all a colouring video that I hope you enjoy. I have always loved the Sunflower Power Digital stamp, and now even more sunflower love in the Sunshine of my Life Digital Stamp that I have coloured for you all today.

Thanks for stopping by,
hugz,
Jessie

Cinnamon With Pumpkin

Hey everyone, today is the first day of previews for C.C. Designs September Release , I have coloured up Cinnamon with Pumpkin using copic makers and enhanced them with my coloured pencils!

Cinnamon with pumpkin 1.jpg

I kept the card for this one fairly simple a couple layers of pattern paper, and a cut of the new Birch Frames Die, I then fussy cut out the imagef and popped her up on foam tape on top of the Frame.

Thanks for stopping by,
hugz,
Jess

Art By Miran Mermaid Meara

Hey everyone, Jessie here again with another card for you! Today we are combining Creative Basic Dies, and Art by Miran stamps!

Art By Miran 1

I coloured up Art by Miran’s Mermaid Meara with my copic markers, then die cut her out using the largest die from the Fancy Squares & Little things die set. I then brushed some purple and dark grey ink around the edges before I distressed the paper.

Copics used:
Skin – E04, E13, E11, E21, E51, E50
Hair – BV 08, BV04, BV02,BV01
Tail- BV29, BV25, BV23, BV20
Fins – RV29, RV252, RV23, RV20
I used some white guage from Windsor and Newton to add my white spots.

Art By Miran 2

A few layers of Spring Basics paper pad from Maja Designs lace from my stash, Wild Orchid Crafts flowers, and a puffy “Smile” sticker finished off the front of this card.

Art By Miran 3

We hare having a fun weekend over at the Passionate Paper Creations Facebook page, a party with Art by Miran, if you are not a member there what are you waiting for?

Thanks for stopping by,
Hugz,
Jess

Roberto’s Rascals Creepy Crawlies

Hey everyone, today I have a DT project for C.C. Designs. I used one of the August release stamps Roberto’s Rascals Creepy Crawlies, and the coordinating dies! I stamped the image on my Copic X-press it blending card and coloured it up with my copics.

Cc blog august

On a piece of white cardstock I cut out the largest Layering Tags Die and inked a fun background on it, punched a whole at the top and stamped a sentiment from the Robertos Rascals Monster Mash set to finish this tag.

Now jump over to the C.C. Designs store and grab these halloween goodies for yourself! I made 18 of these for my sons Halloween goodies for his classmates this year.

Thanks for stopping by,
Hugz,
Jess

Speedy Tilda

Speedy Tilda 1

Hey everyone! Today I have a design team project for Quick Creations! Today I have painted up Italian Speedy Tilda with my Schmincke Horadam Watercolours. There is a video over on my youtube channel.

Speedy Tilda 2

I used a few pieces of Prima Marketing Tales of you & me patterned paper and some kraft card stock. A bunch of ribbon, lace and Wild Orchid Crafts Flowers finish off this card.

Speedy Tilda 3

You can purchase this card here.

Thanks for stopping by,
hugz,
Jess

Candibean Blossom Girl Shaker Card

Candi Bean Shaker.jpg

Hey everyone! Today I have a fun shaker card to share with you all. I just love the versatility of the Fancy Squares & Little Things Die from Creative basics for making things like shaker cards they layer together perfectly for a thick enough frame to make them super easy to hide the foam tape behind!

I coloured up this little lady from the Candibean  Blossom Girls stamp set with my copic markers and fussy cut her out then attached her to the front of this card as the perfect little image for it. I love this little ladies!

Thanks for stopping by,
Hugz,
Jess

Pure Prairie Bouquet

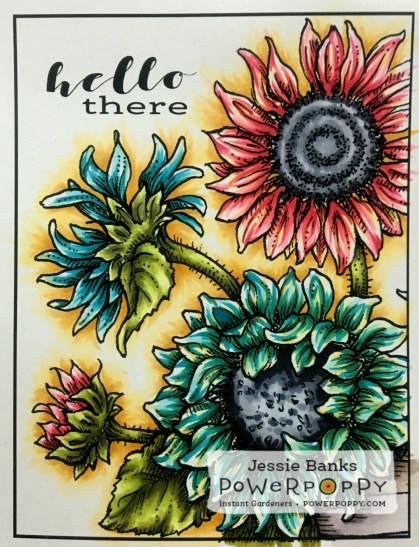
Hey everyone! Today I get to share with you my first ever Design Team post for Power Poppy, I have loved these flower stamps since I discovered them about a year ago. Needless to say I as over the moon when I was asked to take a DT position with them.

Now before we get into the new bouquet, remember to stop by the Power Poppy blog tomorrow to see the new Clear stamps being released!

PP Prairie Bouquet

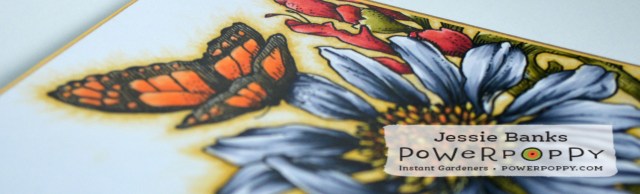
I zoomed in and cropped out a part of the Pure Prairie Bouquet to use for my card, I flipped the image so the butterfly faced the opposite direction. I didn’t do any research for proper colours for anything, just, as I usually do, grabbed whatever I thought looked pretty. Unfortunately I couldn’t get the background to photograph the way it really is, the camera is leaving it a way harsher line around the yellow, where in real life it slowly fades out into the white and you don’t see that sharp transition.

Don’t forget to go to the Power Poppy Blog and see all the awesomeness the team created with this image!

PP Prairie bouquet 2

Copics used:
Background – Y26, Y21, colourless blender
Main Flower – BV29, BV25, BV23, BV20
Pink Flowers – R89, R85 R83, R81
Teal Flowers – BG09, BG07, BG05, BG01
Flower Centers – YR18, YR09, YR04, Y15
Greenery – YG99, YG97, YG95, YG91, Y11
Red – R89, R29, R27, R24, R22
Butterfly – YR18, YR09, YR07, YR04 YR14
– W9, W7, W5, W3

PP Prairie bouquet 3

Thanks for stopping by,
Hugz,
Jessie

Garden Marci

Garden Marci

Hey everyone! today I have another DT project for Quick Creations! I coloured up Garden Marci with my copic markers. I am sorry but I didn’t write down the colours used on this one.

Garden Marci 2

I have been a little hooked on the Bo Bunny Calendar Girl paper pad, the floral in there is to die for! Just a few simple layers of pattern paper some Wild Orchid Crafts Flowers and a twine bow finishes off the front of this fairly simple card.

Garden Marci 3

Thanks for stopping by,
hugz,
Jess

Blossom Girls

Candi Bean

Hey everyone! Today I have a CAS card to share with you all! I used the Candibean Blossom Girls. I made masks for the two girls infront by stamping them on masking paper and fussy cutting them out. I used a scrap piece of paper to plan out how far apart they would be stamped, I then stamped the girls in front on my Copic Xpress-it blending card and then added their mask and stamped the girls in behind.

I coloured them up with my copic markers and cut the pannel down to 5 1/4″ x 3 7/8″ and then layered a pink and blue cardstock in behind and added it all to an A2 size cardbase.

Thanks for stopping by,
Hugz,
Jess