Cute Christmas Card by Kaelene Bennett

Kaeleen

Hey crafters! Kaelene here to bring you a Christmas card using my electronic die-cutting machine for Jess’s October Christmas Blog event!

Kaeleen2

Did I say I loved Christmas? Well I do!!!!

I used Christmas paper from my stash that I purchased at Hobby Lobby.

The bear was cut from an svg file I purchased from treasurebox.com.

I’m loving all the cards posted here! Thanks so much for checking my card out 🙂

Hugs

Kaeleen

My FaceBook Page

Just a simple Christmas.

DSC_0134

Hey everyone! Jess here again, have you been looking at the cards for the past few days! It is astounding how talented these wonderful people are.

So while I was planning out my cards for this series, I decided that not everything that you cut on your machine has to be a detailed cut, sometimes you can cut something as simple as the bottom piece for this card, just a simple half circle cut at the bottom. Honestly, unless you are cutting chipboard, or something of that nature, you can do all of your die cutting with an electronic die cutter.

So this card is rather simple, on top of the piece I cut on the cameo, I attached a green polka dot strip, and then took a piece of white cardstock that I punched with a Martha Stewart punch (sorry the name of the punch escapes me at the moment). Then I tied some chocolate brown bakers twine around that.

DSC_0135

Then I stamped the Season’s Greeting sentiment from my go to Hero Art’s stamp set, matted that on patterned paper then added a white banner behind it, added some faux stitching around the bottom panel and put it all on a standard size, top folding card base.

DSC_0139

That’s it for today’s card.

Thanks for stopping by

Hugz

Jess

Day 20… JJ!

Thanks for stopping by today… JJ taking over Jess’s blog today, you can find MY BLOG HERE.

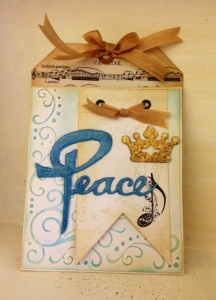
I was recently challenged by my twitter friend Jess to create a Christmas card using an electronic die cutter…I love the look of the simple word die cuts that everyone is using lately, so just knew I had to use that on my card, this is what I came up with…hope you enjoy!

photo-216x300


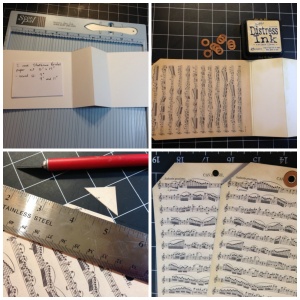
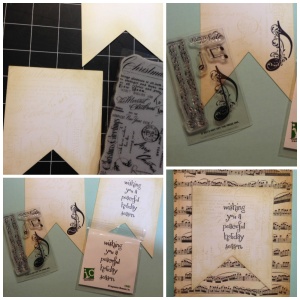
So, I started off by trimming a piece of strathmore bristol smooth card stock to 5″ x 14″ — then scoring at 7″, 9″ and 11″ . I wanted my card to have a vintage ephemera look, so I inked all the edges with tim holtz antique linen distress ink, on both sides of the card. then I wanted to add a piece of vintage music paper, but my original was too large, so I reduced it down on my scanner/printer to just slightly larger than 5″ x 7″ — trimmed it and adhered it to the back panel of the card, trimmed the top corners and punched a hole to resemble a tag.

Jess-Collage-1-300x300


Next, I trimmed another piece of Bristol card stock to 4 â…ž” by 6 â…ž” and ran it through my big shot, using the darice “corner scroll ” embossing folder. Then inked that lightly with tim holtz tumbled glass distress ink.

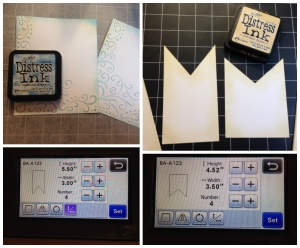
Using my scan n cut machine, I cut out two different sized banner pieces from bristol card stock, using the software in the machine (see photos of actual sizes cut), and again inked with antique linen distress ink.

Jess-2-300x248


I also stamped the front of both banners using the stampendous christmas background cling stamp. additionally on the banner for the front of the card, I stamped a decorative musical note clear stamp from “hot off the press” using black archival ink — and on the banner for the inside of the card I stamped a sentiment from impression obsession.

Jess-3-300x300


I glued the longer narrow banner to the top right side of the embossed piece, then added two eyelets, threaded vintage seam binding through the holes and tied a small square knot.

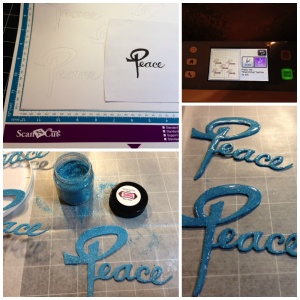
Then I got to work on the most unique part of the card, the hand-written word “die cut”.

I looked online for inspiration for a font style I liked. then once I had decided on the style I wanted to use, I practiced sketching out the word “Peace”, using my black pitt pen brush tip marker. once I was happy with the design, I scanned it into my scan n cut machine and slightly resized it to fit the front of my card. I cut out three of same size, and glued them together on top of each other, to give it some dimension. then I glittered my handmade “die-cut” with micro fine glitter in the “blue skies” color…but to keep the glitter contained, I covered the whole die cut in glossy accents and set them aside to dry overnight.

Jess-4-300x300


I thought the card front still needed something, so I tried a few options, finally deciding on the crown (an existing file in my scan n cut software) I cut out three identical crowns in the smallest size, glued them together and tried using gold sparkle pearlex powder, but it wasn’t sparkly enough for my liking…so I embossed the crown using versamark, gold embossing powder and tiny bits of frontage embossing powder and glitter, just to give it some added “bling” & dimension.

Jess-5-300x300

I assembled the card using scotch quick dry glue, and adding the stamped banner/sentiment on the inside of the card. i finished everything off by adding another double bow using my vintage seam binding ribbon.

I’m pretty pleased with how it turned out, considering Iève never used my machine to do that before…so thanks Jess for the challenge!


For the Christmas in Cricut – Linda Holloway

unnamed

Hi Jess and friends! Its Linda here today!
Thank you for including me in your October Christmas Card Series. I am honoured to be included among all of these very talented card artists.
To create this card I used my trusty old Cricut Personal Electronic Cutter with a 6 inch wide mat. I love this machine and am constantly going back to it even though I have other cutters.
I used the Cricut Artbooking Cartridge and cut the images of the deer, doily, snowflakes and poinsetta from cardstock. The snowflakes were covered with Stickles Rock Candy and set aside to dry.
The base  paper is from the Close To My Heart Seaside Collection with the edge inked in Saddle Brown.  The second paper layer is edge distressed and from CTMH Yuletide Carol Collection. They were attached to the card base with liquid adhesive. Then the doily was glued down.
The manilla shipping tag was from my stash and edged in Saddle Brown ink. The bow is seam binding ribbon. I glued down the reindeer and used dimensional tape to attach the tag to the card. The reindeer nose is itty bitty bling.
The three snowflakes covered in Rock Candy Stickles  were attached to the card with liquid adhesive. Then the green pinwheel shape was glued down. I layered the two red pinwheels with dimensional tape and then glued the smalles snowflake on top.
The complete list of supplies used can be found on my blog : http://mrshollowaylovesstamps.blogspot.ca/
Happy Card Making!
Linda

Non Traditional colours- DarcieGlam

1-P1030357-001


A big hug and thank you to Jess for asking me to participate in the Christmas Card Challenge! I decided to go with a retro theme (go figure) and use non-traditional colors. I designed and made the tree using the basic shapes in Open Office Impress, a free program, and made the inside pieces too. Then I printed them in black and scanned the page into my Brother Scan N Cut. The shapes were cut out of pink card stock.

I found the perfect paper in my stash from an old GSD line and a coordinating paper from WeR Memory Keepers. I didn’t expect to use classic paper lines but the colors were so great!
The white background is Wendy Vecchi embossing paste through a Claudine Hellmuth stencil. After placing the tree on top, I embellished with bling and it was done.
1-P1030359-001
For the inside of the card, I placed two coordinating strips of paper on each end and added my cut shapes. I placed paper circle accents on top and a gemstone in the star. The sentiment was printed on my computer. I don’t usually have the patience to cut and line up letters!
1-P1030366-001
Hope you enjoy my card and are having a great time seeing all the wonderful creations Jess is assembling. Happy Cardmaking! XX DarcieGlam
You can find Darcie and her sister Johnna’s wonderful mini albums here.

Yuletide Blessings by Kay Roussel

104

106


Hi There Its Kathleen from Morgan’s Fancies here with my contribution to the October Holiday Cards hosted by the lovely Jessie Banks.

I have acquired the Silhouette Cameo this year and have been in love with it and want to thank Jess for the inspiration for using this wonderful machine in my card making efforts.

This card is built upon a white cardstock 6 x 6 card base. All files were either free files from a wonderful designer named Penny Duncan, her site is http://pennyduncancreations.blogspot.com or were created by yours truly.

Here is the material list I used:

  • DCWV: The Christmas Stack 12 x 12 pad
  • Darice Core’dinations: Cardstock in Golden Pearl
  • My Mind’s Eye: Lost & Found Christmas 6 x 6 pad
  • Momenta Textured Cardstock 6 x 6 pad
  • American Crafts Cardstock
  • Various Cardstock scraps from my stash

I used a label cut file from Penny Duncan and altered it to fit my needs for this card. I then offset it twice to get the resulting two mats. The font used for the sentiment is called British Outline Masculine.

For the Fireplace I used Google to find a clip art picture and traced it in the Studio software. I then did two internal offsets to get the other layers.

For the Yule log, candles and flora I again used Google to find reference photos and drew out the log, candles, leaves and shapes. I added with fine line markers the texture lines on the log and leaves and used Bazzinks! Squares to outline it all. The candles are actually two layers. One white and one yellow I just snipped the white flame parts off and glued it down to the yellow. To make the flames stand out I also inked them lightly with Memento Ink in Morocco.

Once assembled the sentiment, fireplace and Yule Log were mounted on the Golden Pearl cardstock and popped up on some pop dots from my stash.

Inside of the card has a few layers from a Shapely cut file from Penny Duncan and printed a lovely poem about Yuletide I found while doing some picture reference researching for this project. This was printed using the sketch function of the Cameo and the font used was Black Chancery.

Thanks for checking out October Holiday Cards and stay tuned for more great cardmakers and ideas as the month continues.

If you liked what you saw here and would like to keep in touch you can find me on Facebook: https://www.facebook.com/MorgansFancies or on my blog: http://morgansfancies.wordpress.com/

Happy Crafting!

Kathleen

Lawn Fawn Christmas

DSC_0128


Hey everyone! Did you see Jani’s card yesterday (and the file that was in it) if you didn’t you should really go check it out!

So I am continuing with my breaking of the using digital files thing for the month, I am so in love with this stamp set that I am still using it! So again this is using the Snow Day stamps and dies from Lawn Fawn. So I stamped 2 of the cute bunnies and coloured them with copics (W00, W01, W03, W05, W07, R20, R22), and the little bird (R22, R24, R27, R29). I then stamped the trees using Soft Leaf ink from Hero Arts, and Olive ink from Creative Memories, and the bow is stamped in Memento Tuxedo Black.

DSC_0129


The background for my little scene is on Canson watercolour paper, painted with Peerless Watercolors. I then splattered it with Heidi Swapp Gold Lame ink and put it on a patterned paper stash from my Simon Says Stamp card kit patterned paper stash (in otherwords I can not remember who this paper came from lol), put it on a grey card base and called it finished,

DSC_0130


Thanks for stopping by

Hugz

Jess


Snowflake Window Cards by Jani Lewis

snowflake-cutout-card--01

Hello, My name  is Jani and I love snowflakes and making my own cut files. I have a couple of easy Snowflake Window Cards with with svg files that I made.

Let me show you how they go together and then you can find the link to download the cut files at the bottom of the post.

For the first card…

The file for the 8 1/2 by 5 1/2 inch card base is included but you could also just cut it yourself.

The card top has a snowflake cut.  I placed it directly to the card base. You could also pop it up using foam squares.

card 1  pict

All the pieces were cut from Neenah 110 pound cardstock. I used Lindy’s Stamp Gang Sprays to color them. I list the colors in the video below.

The card top shimmers but unfortunatelysnowflake-cutout-card--21 it does not show up well in pictures.

I stacked the snowflakes over the cutout area in this order.

snowflake order card 1 snowflake-cutout-card-2I added a little bling.

For the second card…

Both the card base and card top have snowflake shapes cut out to make a nice window.

card 2  pict

I did the snowflakes a little differently on this one.

snowflake order card 2

snowflake-cutout-card-22I added some Stickles and a gem in the center.

Here is a look at the finished cards.

snowflake-cutout-card--01snowflake-cutout-card--30

Check out the video I made showing how I put the 2 cards together.

You can download the cut files HERE

The supplies will be listed on mu blog, Paper Compulsions.

Thanks so much for watching. I hope you enjoy the files and create some wonderful cards.

Simple trees

DSC_0111


Hey everyone! Jess here again using the same stamp and die set as yesterday, the Snow Day set from Lawn Fawn,  This card I kept rather simple stamping the tree outline and colouring them in with my Copic’s, G111, G14, G17, and G28, then cut them out with the coordinating die.


DSC_0112


I then wrapped some May Arts twine around the white panel and stamped my sentiment in Versafine Onyx Black Ink, and attached my trees with foam tape. Then finished off the twine by tying it in a bow over top.

I dug in my Scraptastic Life Noted card stash and found this fun triangle one and cut it down to fit behind the white panel. Noticing that it looked rather plain on the Neenah Solar white card base I took out my most used and loved stencil (Tim Holtz Spatter stencil) masked off the areas I didn’t want to use and then used distress ink in Peacock Feathers, and picked raspberries through the stencil to create a lovely backround. Attatched my focal panel on some foam tape and it was complete.

DSC_0114


Thanks for stopping by,

Hugz

Jess

Bunny Christmas

DSC_0107


Good morning everyone! Did you check out Annette’s card yesterday! I really loves the traditional colours she used! If you didn’t you should go back and check out her post!

So confession time, I went to put today’s card up this morning, because yesterday got away from me. Attempted to pull the photo’s off of the memory card, and well the card is fouled and I can not get anything off of it. Would normally not be a big deal, but I live 20 minutes out of the city, and nothing is open at 6:30 am on a statutory holiday where I can purchase a card. So today and tomorrows card, unfortunately will not be using my cameo. They are cards I had photographed and already pulled off for a couple posts in November. Plus note, you get to see them now!

So this card was made using the Lawn Fawn Snow Day Stamps and Dies, as well as the Lawn Fawn Trim the Tree Stamps and dies. I stamped the two bunnies that face eachother and coloured them with my copics W00, w01, w03, w05,w07, R22, and R20. I also stamped a row of lights and the bell from the Trim the tree set and coloured them with Y11, Y13, and Y15, Using the coordinating dies I cut them all out.

DSC_0109


I then cut a piece of Neenah white with the row of trees in the Snow Day set and pieced it back together creating a back panel for my bunnies to rest on.  The sentiment is stamped with Versa Fine Onyx Black ink and then a piece of May arts Twine is tied in a bow underneath it. All the patterened paper is scraps from my scrap bin, I know the triangle paper is from Simon Says Stamps christmas card kit last year (I can not remember who the manufacturer was) and the other paper I do not even have a guess but its just a simple grey paper with a white dot pattern.

DSC_0110


Thanks for stopping by

Hugz

Jess.