For the Christmas in Cricut – Linda Holloway

unnamed

Hi Jess and friends! Its Linda here today!
Thank you for including me in your October Christmas Card Series. I am honoured to be included among all of these very talented card artists.
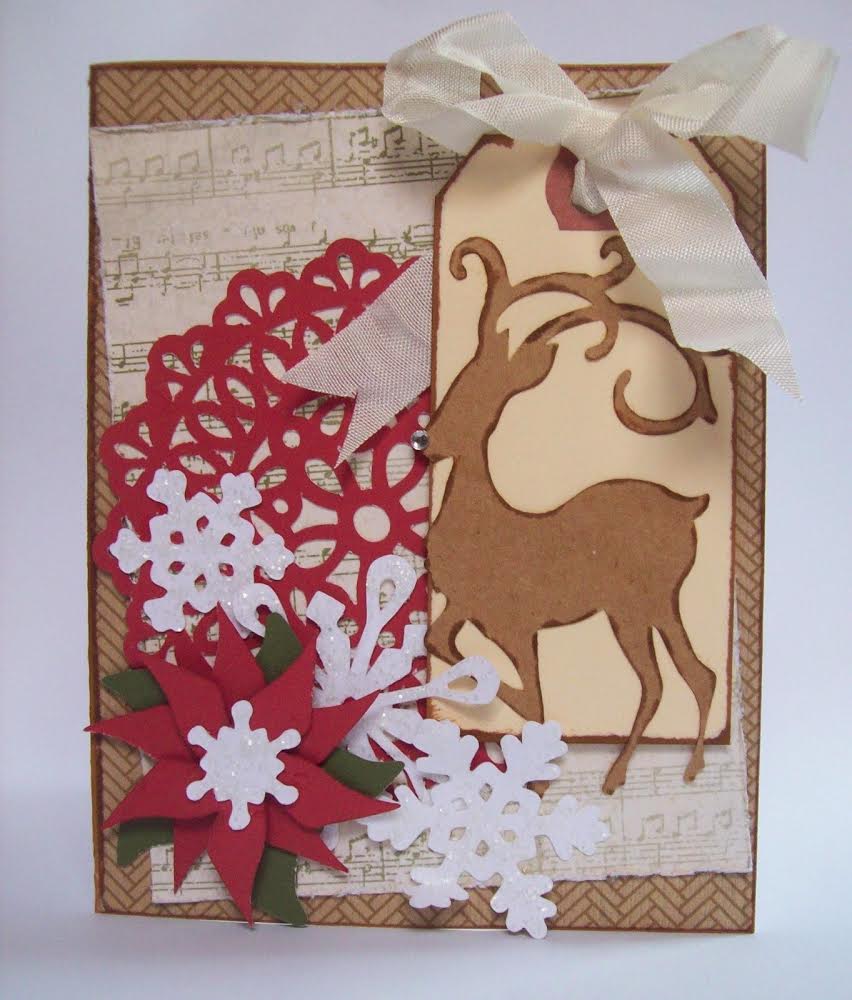
To create this card I used my trusty old Cricut Personal Electronic Cutter with a 6 inch wide mat. I love this machine and am constantly going back to it even though I have other cutters.
I used the Cricut Artbooking Cartridge and cut the images of the deer, doily, snowflakes and poinsetta from cardstock. The snowflakes were covered with Stickles Rock Candy and set aside to dry.
The base  paper is from the Close To My Heart Seaside Collection with the edge inked in Saddle Brown.  The second paper layer is edge distressed and from CTMH Yuletide Carol Collection. They were attached to the card base with liquid adhesive. Then the doily was glued down.
The manilla shipping tag was from my stash and edged in Saddle Brown ink. The bow is seam binding ribbon. I glued down the reindeer and used dimensional tape to attach the tag to the card. The reindeer nose is itty bitty bling.
The three snowflakes covered in Rock Candy Stickles  were attached to the card with liquid adhesive. Then the green pinwheel shape was glued down. I layered the two red pinwheels with dimensional tape and then glued the smalles snowflake on top.
The complete list of supplies used can be found on my blog : http://mrshollowaylovesstamps.blogspot.ca/
Happy Card Making!
Linda

White Christmas by Jen (ozegran)

Hey bloggers! I’ve taken over Jess’s blog for today to share a Christmas Card I made!

IMG_1771

Firstly though, I must thank Jess for giving us a chance to kick our butts into gear! By hosting this October Christmas Card Blog Jess has forced us to start making our Christmas cards BEFORE the silly season is upon us!

Secondly, and this one’s the hardest for me, is to get us to use our electronic die cutting machines! I must tell you I have had my Silhouette for a couple of years now and I’ve probably count the amount of times I’ve used it on one hand (I know, right!). So when I switched it on this time, the LED display menu would not work 😦 This happened to me when I first switched on my Cameo for the first time. After a while the menu appeared though – this time it did not 😦 So I just worked blindly by pressing the down button and enter to make it load or unload LOL.

So…..I forgot how to convert the files I wanted to use (my own) in order to cut them. I converted the pics to svg files but from then on everything went blank *sigh*. So I just got out the ONE Christmas cartridge I owned for my Cricut and tried to cut the intricate designs but alas it just shredded the cardstock 😦 *sigh*.

So….I resorted to the graphics that came with the Silhouette Designer Edition software and just used the tree outline, looks like I failed miserably LOL.

I used an 8 1/2″x5″ piece of white cardstock for the card base. I cut another piece of the same white cardstock for the card topper to 4″x5 1/4″, embossed it with the Message in a Tree embossing folder by Couture Creations. I adhered this piece to the card base using pop dots.

20141005-4

Once the tree shape was cut I heat embossed it using Ranger’s Queen’s Gold embossing powder, along with the tree trunk. I heat embossed the star using Ranger’s Gold Tinsel embossing powder (love that stuff)!

I adhered the trunk, tree and finally the star using Tombo Mono Multi Liquid Glue, then took a strip of white ribbon, tied it into a bow and adhered it to the base of the tree using a glue dot.

20141005-2

I always add sentiments to the inside of my cards (sorry, no pic) as well as making a matching envelope. Here you can see I have added Merry Christmas by heat embossing it with the gold embossing powder.

IMG_1775

Well that’s my post! Don’t know if I’ll go back any time soon to my Silhouette – unless someone wants to show me how to use it properly LOL.

I have been inspired to make more Christmas cards though, thanks to Jess’s idea and all the amazing cards I’m seeing here! Thanks for stopping by! Why not go check out my blog to see if there’s anything there that might inspire you!

Smiles

Jen
(ozegran)

PS: So sorry about the quality of the pics! I am going to do some research into how to make a light box and how to photograph my pics so that they actually look any good!

Happy Holiday – Marie

20140930_171504


Hey everyone, Marie taking over today, you can find my blog here. Card base is Premium Vanilla Card 8 1/2 x 5 1/2, score both sides at 2 1/8.


20140930_171421


I used the Elegant Embellishments by Anna Griffin for Cricut, Hampton Art 6 pcs die and stamp set (SC-664). The tree is green card with Crimson Zazz, and the tag is green and red card, outside panels are from Basic Grey’s Aspen Frost (cut at 5 3/8 x 2 18)


20140930_171055